3 Exercises to Get Rid of Hand Pain When Riding
Many of us mountain bikers have had hand pain or will have hand pain. We have changed our grips, had a bike fit, changed our suspension, and many many more things. Those items have been talked about and will continue to change for different bikes and for different riding types. Many of those are very specific to you the individual, your hand size, and your local trails. In this article, I’m going to talk about an area that doesn’t get as much press, but can make a big difference in hand pain as well as for other areas of our bodies, including our back and our necks.
When we think about how we are connected to the bike, we know that is through our hands, feet and sometimes our butt if we are sitting down.
So that makes the connection of the hands and feet to the bike very important as well as how those two connect via the body. As you increase weight through your feet, you lighten up the weight on your hands. Another way of taking pressure off your hands is to be more stable through your trunk and your hips.
What… Pressure can be taken off your hands and held with your trunk and hips?
Yes!
I want you to think about a deadlift. You are lifting your hands up (typically with weights in them) and holding that load through your hips, trunk, and feet.
Now when we place our butt on the saddle then it takes away the ability to load your hips as much and makes the connection between feet to hands more from butt to hands. This then makes your trunk control/stability more important. Note: you don’t want to take all weight off your feet if your butt is on the saddle.
This main idea/concept of your trunk unloading your hands can help you to decrease the pressure and grip strain needed for biking. Now there are definitely times in biking that you will need to have more pressure through your hands, even sustained at times. However, the ability to unweight your hands and give them a bit of a break when you can, is very important.
So I’m going to give you 3 exercises that work on your strength and control of your hips and trunk to understand how to unweight your hands. Therefore, decreasing the pain in them, or letting them have a break during your ride. Another base exercise for this is a deadlift (good morning) adding in different rotational forces for your trunk to hold against them. Doing staggered stances and only holding the weight with one arm are key to challenge your trunk and hip control.
** Now there are always other reasons for hand pain. This is just a focus on an area that isn’t discussed as much, please seek care from medical professional if pain persists**
Exercise 1: Sitting and Unweighting Hands
Objective
- To understand the concept of how to unweight hands from a sitting position and not move body
Perform:
- As needed to understand the control aspect to be able to transfer to biking
Things to Note:
- Don’t move trunk
- You will place more weight through feet, but hold some of the weight through trunk not all through feet
Exercise 2: Tall Kneeling Hip Hinge Hold
Objective
- To understand the concept of how to unweight hands using hips and trunk
Perform:
- As needed to understand the control aspect to be able to transfer to biking
- Great warm up for deadlifting
- As needed for core exercise
Things to Note:
- Your back shouldn’t be stressed, if it is, then engage/tighten your core more, or straighten back more
Exercise 3: Hip Hinge Hold with Arm Exercise
Objective
- To strengthen trunk, hip, and shoulder muscles with rotational stability for biking
Perform:
- Daily
- Do 10-15 reps 2-3 sets
Things to Note:
- Your back shouldn’t be stressed, if it is, then engage/tighten your core more
- Your Pec shouldn’t be working but actually stretching during exercise
- You will be using your shoulder blade muscles
About the Author:
Liz Koch, PT, DPT is a physical therapist that knows exactly what it is like to have pain. She has been to many PTs over her life, which directed her to becoming one. She has been a mountain biker since she was a kid and has recently opened up her own clinic in Western North Carolina, Blue Ridge BioMechanics. She wants to share knowledge so you don’t have to be in pain when riding and you can strengthen your body to not get into pain. She has focused this mission to Rad Mountain Biking Ladies on Facebook and through her online business, The Ride Life. Let her know if you have questions.
*If you have pain please consult with a doctor or physical therapist for further evaluation, Liz Koch and companies are without liability if you injure yourself while performing these exercises*
When we think about how we are connected to the bike, we know that is through our hands, feet and sometimes our butt if we are sitting down.
So that makes the connection of the hands and feet to the bike very important as well as how those two connect via the body. As you increase weight through your feet, you lighten up the weight on your hands. Another way of taking pressure off your hands is to be more stable through your trunk and your hips.
What… Pressure can be taken off your hands and held with your trunk and hips?
Yes!
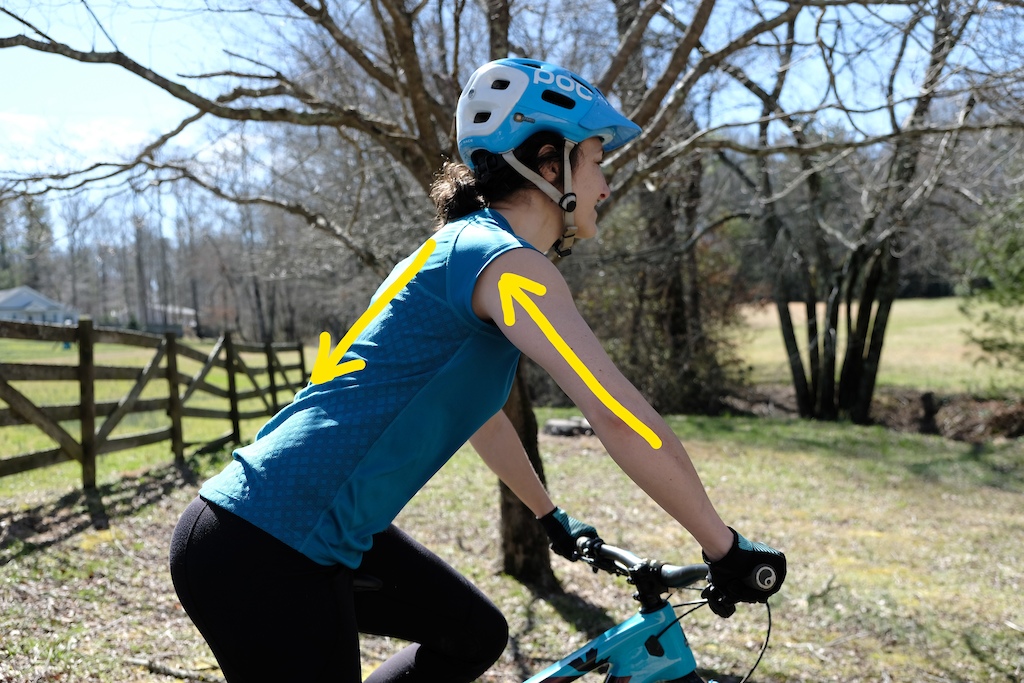
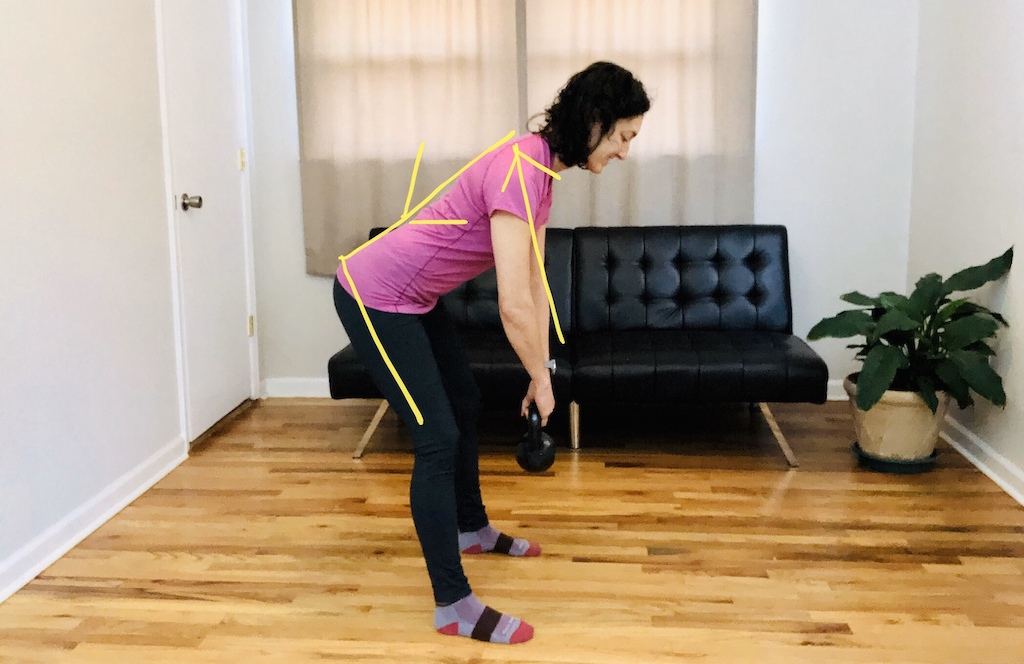
I want you to think about a deadlift. You are lifting your hands up (typically with weights in them) and holding that load through your hips, trunk, and feet.
Now when we place our butt on the saddle then it takes away the ability to load your hips as much and makes the connection between feet to hands more from butt to hands. This then makes your trunk control/stability more important. Note: you don’t want to take all weight off your feet if your butt is on the saddle.
As you can see in both pictures, you can use the same muscles to help offload your hands as you use when you are deadlifting
This main idea/concept of your trunk unloading your hands can help you to decrease the pressure and grip strain needed for biking. Now there are definitely times in biking that you will need to have more pressure through your hands, even sustained at times. However, the ability to unweight your hands and give them a bit of a break when you can, is very important.
So I’m going to give you 3 exercises that work on your strength and control of your hips and trunk to understand how to unweight your hands. Therefore, decreasing the pain in them, or letting them have a break during your ride. Another base exercise for this is a deadlift (good morning) adding in different rotational forces for your trunk to hold against them. Doing staggered stances and only holding the weight with one arm are key to challenge your trunk and hip control.
** Now there are always other reasons for hand pain. This is just a focus on an area that isn’t discussed as much, please seek care from medical professional if pain persists**
Exercise 1: Sitting and Unweighting Hands
Objective
- To understand the concept of how to unweight hands from a sitting position and not move body
Perform:
- As needed to understand the control aspect to be able to transfer to biking
Things to Note:
- Don’t move trunk
- You will place more weight through feet, but hold some of the weight through trunk not all through feet
Exercise 2: Tall Kneeling Hip Hinge Hold
Objective
- To understand the concept of how to unweight hands using hips and trunk
Perform:
- As needed to understand the control aspect to be able to transfer to biking
- Great warm up for deadlifting
- As needed for core exercise
Things to Note:
- Your back shouldn’t be stressed, if it is, then engage/tighten your core more, or straighten back more
Exercise 3: Hip Hinge Hold with Arm Exercise
Objective
- To strengthen trunk, hip, and shoulder muscles with rotational stability for biking
Perform:
- Daily
- Do 10-15 reps 2-3 sets
Things to Note:
- Your back shouldn’t be stressed, if it is, then engage/tighten your core more
- Your Pec shouldn’t be working but actually stretching during exercise
- You will be using your shoulder blade muscles
About the Author:
Liz Koch, PT, DPT is a physical therapist that knows exactly what it is like to have pain. She has been to many PTs over her life, which directed her to becoming one. She has been a mountain biker since she was a kid and has recently opened up her own clinic in Western North Carolina, Blue Ridge BioMechanics. She wants to share knowledge so you don’t have to be in pain when riding and you can strengthen your body to not get into pain. She has focused this mission to Rad Mountain Biking Ladies on Facebook and through her online business, The Ride Life. Let her know if you have questions.
*If you have pain please consult with a doctor or physical therapist for further evaluation, Liz Koch and companies are without liability if you injure yourself while performing these exercises*
Author Info:
Must Read This Week


As someone who rides in coach on a train, I tend to read these articles while enjoying a cold beer during my travels.
Getting my effective top tube correct (adjusting saddle not too stretched out or cramped)
Raising bar height to help off load pressure on hands.
Thick comfy grips, ODI Rogues seem to be the best
High volume tires (2.6) with inserts, running low PSI
Setup fork with good small bump compliance
And don’t hold on to tightly !
Go for a completely non technical ride on it where you do not need a dropper. See if you get the hand pain.
Now do the same ride again with the dropper removed and a setback seatpost installed to bring your saddle back the difference between old and new bike.
If you get no hand pain then order yourself a laid back dropper post.
9point8 makes one. The fall line.
If I got one of the new “tri” mtbs that is what I would do.
I assume you have a good idea of your saddle position relative to the BB on your previous bike.
Ride hard. I do not disagree with the other suggestion of the bar height but there is only so much that helps.
Ride hard.
@roma258:
I guess you can receive the load on your bars when seated.
This feels a bit like the notion that you use clipless (clips, pads whatever you want to call them) to pull up on the return stroke. I have read that it is less efficient than just testing on the return stroke. As such you are best to let the muscles do what they need to and not try and balance with others. If some muscles are weak you need to strengthen them.
I also tuned my position out of the "no-man's-land" area between a roadie position and an upright one. In the "no-man's-land" position, the upper body weight wants to fall. In the roadie drop position, it can't fall any further. In an upright position, you don't want to go any more upright else it's too much pressure on the arse. The position I'm in, is more of an "universal athletic position", where my shoulders stay directly above the feet (relative to pull of gravity).
To get such a position, I tend to raise my grips to be similar height off the ground as the saddle. With modern steep STA bikes, I've had to use riser stems and bars.
I've never understood why bars are bent backwards towards the rider. When we outstretch our arms our hands naturally stay straight, not bend outward, so this bend in the bars puts a lot of pressure into your hands therefore cutting off circulation. If you try this and it doesn't help I'll refund your money
times.”
-switch to flat pedals. To keep enough pressure on your feet, you end up reducing hand pressure
- start rock climbing
- do enough strength training
* that is the correct size for a pint friends over the Atlantic!
1. Ride more
2. Don't ride less
3. Ride more, whilst not riding less
This has been: 3 ways to stop hand pain whilst riding